|
I
have always been fascinated by those energetic people from northern
France, known to history as the Normans. In the space of
two centuries the duchy of Normandy stood as a prime mover in European
affairs, not only completing the conquest of England but
also stretching its arms out to southern Italy and Sicily. Even
after the duchy lost its autonomy and was absorbed into the Kingdom
of France-proper it still exerted great power and influence within
that realm. Many of these men were larger than life figures who
led lives even Hollywood could not imagine. Not only have I had
a life-long interest in the Normans themselves but I have also had
a particular fascination with their arms and equipment.
Who were these people and what made them such a significant force
upon the European stage? What equipment and techniques made them
so effective on the battlefield? Can their lethality really be
a result of superior technology or was it something more intangible
like national pride? Perhaps it was simple greed and ambition that
fueled the fires of conquest?
Here we will discuss the Normans and their history and I will outline
my own personal attempt to recreate the arms and equipment of a
Norman warrior of the 11th century. Perhaps in that
last respect this is just as much my story as it is theirs.
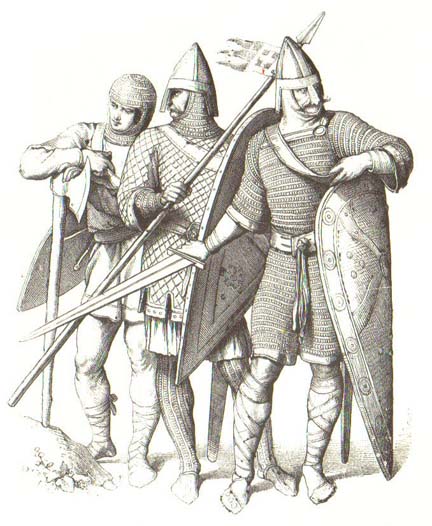
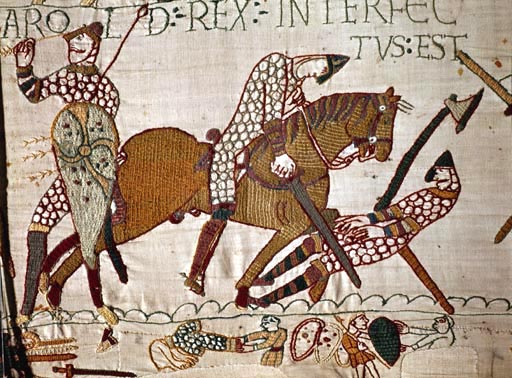 A
detail from the Bayeux Tapestry
A
detail from the Bayeux Tapestry |
Origin
As
the 10th century began Europe was at the height of the
so-called Viking age. (The term Viking being more illustrative
of their raiding activities than of the people themselves.) Seafaring
warriors from the Scandinavian countries of Norway, Denmark, and
Sweden had made incursions into northern Europe and the Slavic regions,
as well as penetrating as far as Asia minor and the North American
continent. In many areas these nordic raiders had ceased their
plundering and had become colonists and traders. In 911 a Danish
invasion fleet under the command of Hrolf the Ganger (Ganger meaning
walker as apparently Hrolf was rather tall and long-legged for the
age) sailed into the Seine Valley intent on stripping the region
of its worth.
At
this period in history France as we know it today did not exist.
The region was divided into duchies and counties that owed only
nominal allegiance to the French King Charles II, known as the
Simple.
Charles seems to have come to the conclusion that he could not deal
with the Danish invaders on a military level and decided to buy
them off. This had become a common practice in Europe when dealing
with Viking invaders. However, instead of offering the Danes
gold or silver, (hence the term Danegeld.) Charles offered
them land instead. The land around Rouen was thereby ceded to Hrolf
and his army. This act can be seen as a rather pragmatic decision
by Charles since this area was already under Hrolfs control and
the King had no effective means to dislodge the invaders.
In
912 Hrolf converted to Christianity and allowed himself to be baptized,
changing his name to Rollo in the process. Thus Rollo effectively
became the first Duke of Normandy (meaning land of the northmen.)
and by the time of his great-great-great grandson, Duke William,
the Normans had consolidated their rule over a large area that stretched
from the Cherbourg peninsula to the River Somme. Normandy retained
its autonomy until 1144 when it was invaded and taken by Count
Geoffery of Anjou. The duchy then became part of an Angevin
empire that lasted until 1204 when King Phillip used military force
to bring Normandy back into the French fold, along with Brittany,
Touraine, Anjou, Poitou, and Maine. For the first time in three
hundred years Normandy was again under Royal control.
The
Southern Empire
The
Normans are best known to history as the conquerors of England in
the year 1066. While this operation was certainly no mean achievement
it was far from the first example of Norman expansion and conquest.
Long before Duke William fell onto his face while disembarking on
the beach at Pevensey and cried, I have the earth of England in
my hands! the Normans were penetrating into southern Italy. (Sources
vary as to whether this statement was made by William himself or
another Norman knight in the invasion force.)
 |
According
to the contemporary chronicler Amatus, in the year 999 a group of
approximately 40 Norman pilgrims were returning from Jerusalem and
were at Salerno when it was attacked by Saracen forces. Saracen
being the generic term used by Europeans for those of Islamic faith.
Apparently these pilgrims were astonished and offended at the
lack of resistance by the local populace and obtained arms and horses
from Gaimar IV, the prince of Salerno. The Normans then succeeded
in driving away the attacking forces and were invited to remain
in Gaimars service. The travelers declined this offer and instead
returned to Normandy with an Italian envoy that was apparently quite
successful in recruiting volunteers to come to this land that flows
with milk and honey and so many beautiful things.
While there are various sources that give opposing dates for an
official start of Norman incursion into Italy this is the earliest
documented case of Norman involvement on the peninsula. Another
source, written by William of Apulia, speaks of a meeting in 1016
between Norman pilgrims and a disenfranchised Lombard noble by the
name of Melus. According to William this Melus had been involved
in an unsuccessful rebellion against the Byzantine Empire and was
now in exile. At this time most of southern Italy was under Byzantine
control and apparently Melus styled himself as something of a revolutionary.
In his account William states that Melus was successful in convincing
the pilgrims that the freedom of southern Italy could be achieved
with their help. It is unknown whether their willingness was due
to a sense of religious piety on the part of these Norman pilgrims
or simply a case of blatant opportunism. It must be observed that
the Normans were always ready and willing to combine religion and
opportunity if it was to their advantage.
Due
to the political nature of Norman society the oldest son of a house
would inherit all and younger sons were forced to depend upon their
own initiative, their choices usually being limited to military
service or a life with the church. Consequently, the envoys efforts
at recruitment were quite successful, with many younger sons making
the journey south along with those who had fallen out of favor with
the Norman Duke. Unlike the conquest of England the Italian enterprise
did not occur in piecemeal fashion. There was no single climatic
battle that decided everything like that which occurred at Hastings,
nor was there a quick follow-on campaign to consolidate rule. Over
the proceeding decades there was a steady flow of manpower towards
the Italian peninsula, and by 1046 the Normans had moved into southern
Italy in force. Sergio IV of Naples had granted them a prime concession
of land. This meant they were allowed to hold whatever land they
could retake from the invading Arabs of North Africa. These opportunistic
and energetic northerners were all too willing to take full advantage
of the situation. By 1053 the Normans had taken the entire southern
region of Italy, thereby creating a new empire. Unfortunately this
aggressive expansion had come to the notice of the current Pope,
Leo IX. It was indeed unfortunate for the Pope himself as he would
discover.
In
1035 members of one particular family entered the Italian scene.
This family, the Hautvilles, would become one of the greatest driving
forces of the Norman kingdom in Italy. Three of the younger Hautville
sons: William, Drogo and Humphrey arrived in Aversa to seek their
fortunes. The Hautvilles entered Gaimars service and in 1038 were
part of a 300-strong contingent of Norman knights sent to aid the
Greek Emperor of Constantinople, Michael IV, in an invasion of Moslem
Sicily. The expedition itself was without success but the Normans
in general, and the Hautvilles in particular, distinguished themselves
before leaving the campaign in disgust. William dHautville himself
was afterwards known as William Bras-de-Fer, or William of the Iron
Arm, due to his personal abilities. The Hautvilles would become
one of the primary forces in expanding the Norman holdings in Italy.
In 1046 another Hautville arrived who would become perhaps the
greatest member of the family and bend the very pillars of Christendom
to his will. This man was Robert Guiscard, known as the Resourceful,
the Weasel, or the Wary depending upon the source. Anna Comnena,
daughter of Alexus I of Constantinople, described the Guiscard in
the following manner:
This Robert was Norman by descent, of insignificant origin, in temper
tyrannical, in mind most cunning, brave in action, very clever in
attacking the wealth and substance of magnates, most obstinate in
achievement, for he did not allow any obstacle to prevent his executing
his desire.
 |
Upon
his arrival Robert was disgruntled over not being given what he
felt was his proper due by his older brother Drogo. Instead of
being given a proper fife his brother sent him south to Greek
Calabria, an area that had barely been penetrated by the Normans.
Whether Drogo expected his brother to expand their holdings, or
was simply intending to rid himself of a brother who was by all
accounts villainous and highly ambitious we will never know. Whatever
Drogos motivation may have been Robert Guiscard succeeded in taking
the region and established a base of power at San Marco Argentano.
From this location Robert steadily increased his holdings, and his
power, over the intervening years. In 1051 Count Drogo was assassinated
in his own chapel and was immediately succeeded by his brother Humphrey.
This change of command did little to change matters that had been
growing increasingly hostile for the Normans. The native Italian
populace had grown weary of the Normans strong-arm tactics and
it was now dangerous for even pilgrims to travel alone for fear
of attack.
Thus
it was that the new Pope, Leo IX, felt obliged to intervene and
in 1053 the Pope assembled a Papal army and allied himself with
Constantinople, with the intention of ridding Italy of this Norman
problem. The Normans, under Count Richard of Aversa, Count Humphrey
dHautville and the wily Robert Guiscard, moved to intercept the
Papal army before it could combine with its Byzantine counterpart.
Contact was made on June 17th 1053 near the city of Civitate.
The Normans were rejected in negotiations and reluctantly engaged
the Papal forces. The Pope himself did not participate in the battle
but instead watched from the walls of the city as his army went
down to defeat. Civitate has been compared to the battle of Hastings
for its significance in the history of Norman Italy and in that
respect the comparison is appropriate. In a world-wide context
this comparison really doesnt hold water since, unlike Hastings;
it had very little direct effect on the world outside of the region.
Still, many comparisons can be made with the elite of the Papal
infantry being defeated by Norman cavalry, just as the axe-wielding
Huscarls of Saxon fame saw defeat at Hastings. The Byzantine army
then withdrew without further hostility and the Normans held victory
in their hands.
The
Normans then exhibited the resourcefulness and opportunism for which
history has made them famous. According to William of Apulia, in
spite of the fact that they now held the religious leader of Christendom
as their virtual prisoner, they knelt before Leo IX and begged his
forgiveness. We will never know if this outward show of religious
submission was sincere or merely a medieval example of strong-arm
tactics covered by publicity spin and political correctness. Regardless
of the Norman motivation the result was Papal recognition of Norman
holdings in Italy. When Leo died the next year the new Pope, Gregory
VII, immediately allied the Papacy with the Normans at Melfi in
1059. In spite of Robert Guiscard being excommunicated by the Pope
no less than three times, the Normans thereafter retained Papal
approval in their activities. This association with the Papacy
would continue throughout the rest of the Norman era and would
play a key role in the launching of the Crusades at the end of the
11th century.
Count
Humphrey had died in 1057 and was succeeded by Robert Guiscard,
first as regent and then as count. Apparently the hereditary rights
of Humphreys young son Abelard were of no consequence. Two years
later Robert also ascended to the position of duke of Apulia and
Calabria. In 1056, Roger, the eighth and youngest of the Hautville
brothers arrived in Italy. Robert immediately sent his younger
brother off to Calabria with a force of sixty knights. At the age
of 26 Roger dHautville would gain either experience or a grave
in southern Italy. The younger Hautville did indeed find success
and became his brothers most trusted lieutenant. In an era of dubious
family loyalties the two brothers remained steadfastly devoted to
each other throughout the remainder of their lives. Whether this
was due to any sense of familial loyalty or simply shared ambition
will have to be for the reader to decide.
After
two probing incursions the conquest of Sicily was undertaken in
1061. This operation would take thirty years to complete and was
possible due to the divisions present between the Moslem factions
inhabiting the island. The Normans continued to face problems within
the already conquered areas of Italy, as well as a chronic shortage
of manpower. When these factors are combined with very stiff Moslem
resistance upon Sicily itself the duration of the conquest isnt
surprising. Out of necessity the invasion of Sicily was an amphibious
operation with men and horses traveling by ship to an area south
of Messina. The significance of this enterprise cannot be overemphasized.
A few years later a similar, though much larger, operation would
be undertaken by Duke William of Normandy during the invasion of
England. Therefore, it would be logical to assume the lessons learned
during the invasion of Sicily were put to good use in 1066.
The
first landing south of Messina took place at night with a fleet
of thirteen ships. An original force of 270 knights under the command
of Roger dHautville was joined the next day by a further reinforcement
of 170 knights. This force of less than 500 then took the city
of Messina before Robert Guiscard had made landfall. Over the next
thirty years the Normans would expand their domination of Sicily
through a series of successful campaigns, including the decisive
defeat of a much larger army under the command of Ibn al-Hawas.
Contemporary sources list the Norman numbers at 700 with an opposing
Saracen force of 15,000. Of course these contemporary sources must
always be taken with a grain of salt when it comes to hard statistics.
This battle was the first significant contact between Norman and
Saracen forces and is interesting for this reason alone. Many historians
have credited the initial European success during the crusades to
two factors. The first, political disunity among the Moslem population
is a logical and quite probable contributing factor. The second,
unfamiliarity with European military tactics, seems less valid.
This first contact between Norman and Saracen forces occurred over
thirty years before the first crusade began. Consequently, it is
logical to assume that the opposing sides were quite familiar with
each others tactics by 1096. After the fall of Palermo in 1072
Robert Guiscard never returned to Sicily but instead concentrated
on matters pertaining to mainland Italy. The rest of the Sicily
campaign was left in the hands of his brother Roger. The city of
Noto finally fell in 1091 and marked the completion of the Norman
conquest of the island.
During the campaign the Normans made heavy use of sea power to transport
invasion forces as well as laying siege to cities like Syracuse
and Palermo. The ability of the Normans to use of these unfamiliar
modes of transport and attack can be seen as evidence of their willingness
to adapt to the circumstances at hand. It was also during the
conquest of Italy and Sicily that the concept of a Holy War against
the Moslem world began to take shape in the Norman mindset. So
when Pope Urban II first preached of a holy crusade on November
27th 1096 the idea was far from unknown. By the end
of the 11th century the entire southern half of Italy,
as well as the Isle of Sicily, was under the domination of the Norman
adventurers. Other famous names would follow such as Bohemond of
Taranto, a son of the Guiscard himself who was apparently as cunning
and ruthless as his father. Bohemond would become a key figure
during the first crusade and would rise to fame on his own abilities
instead of resting in the shadow of his father. When Robert Guiscard
died of typhoid on July 17th 1085 he was buried alongside
his brothers in the abbey of the Trinity at Venosa. His tomb was
inscribed with an epitaph that could, perhaps be fitting for the
entire Norman experience of the 11th century:
Hic terror mundi Guiscardus
Here lies Guiscard, terror of the world.
Roberts nephew, Roger II, would succeed his father and uncle by
being crowned king at Palermo in 1130. Roger II then ruled over
a Norman kingdom that would endure until the death of King Tancred
in 1194. The southern kingdom the Normans had so miraculously created
was then absorbed into the Hohenstaufen Empire of Henry VI.
What
reasons can we find for the Norman success in Italy? The Italian
campaign was not a heavily supported European enterprise, nor was
it an example of overwhelming an enemy with superior force. The
mercenaries, who would later become dukes and barons, were the lesser
sons of Norman nobility. In many cases they were adventurers and
exiles who could hope to receive little assistance from their homeland.
One contributing factor is undoubtedly the Normans military expertise.
It is a bit of a stretch to claim that the Normans were the originators
of the use of heavy cavalry in the European context. However, they
undoubtedly perfected the concept and made the most of it. While
the Norman pedites, or infantry, surely played their part
it is the milites, or knightly cavalry, that are spoken of
in the contemporary chronicles. Time and again we read of heavily
outnumbered Norman cavalry smashing a superior enemy force. While
this may very well be propaganda we must remember that not all who
wrote of these exploits were pro-Norman. We must also remember
that Norman cavalry could, and often did, dismount to fight as infantry
when the situation demanded it.
 |
This
tactical sense of flexibility was surely a strong weapon in the
Norman arsenal. Nor should we underestimate the psychological factors
when we speak of Norman success. These descendants of Viking raiders
had cast off the pagan religions of their forefathers and had embraced
Christianity. However, medieval Christianity was a far different
thing than it is here at the dawn of the 21st century.
To the medieval mind God moved and worked in all things in a very
absolute sense. If the Normans gained success through military
conquest it was simply Gods will that they should do so and if
they received Papal blessing for it then so much the better. The
fact of that blessing being won at the point of a sword was of little
consequence to the Norman mind. Combine this sense of religious
righteousness with a willingness to bend that same religion, and
secular law, to fit their own needs and you have a very dangerous
combination when combined with skill at arms.
Still,
the Normans were not above sensing the reality their situation and
molding it to fit their needs. The Moslem inhabitants of southern
Italy and Sicily did not endure the wholesale rapine and slaughter
that would occur during the first crusade. The Normans shaped the
local forms of government with their own brand of feudalism, yet
the local non-Christian populace was allowed to remain in positions
of influence in trade and commerce.
The modern mind may look upon these events of nearly a millennium
past and view them as a form of enlightened tolerance. In my opinion
this would be a mistake. The Normans knew they were sleeping among
the enemy and if they were to succeed the local inhabitance would
need to be placated, and brought into the fold as much as possible.
They simply did not have the manpower to rule with an iron fist
that was completely closed. Instead they were forced to change
the circumstances to their advantage, a skill they honed to a razors
edge. Even though they faced unrest and rebellion on one scale
or another during the entire time of the southern kingdoms existence,
it is a remarkable testament to their drive and skill that the Normans
were able to rule effectively with so few numbers. The Norman domination
of the Siculo-Italian region also produced a type of architecture
that combined elements of northern European, Greek and Moslem design
into a unique style. Many of the architectural works that still
exist in Italy today are seen as classic examples of Norman achievement.
In the end all that can firmly be said is that a relatively small
group of northern mercenaries achieved improbable success and carved
out an empire by shear tenacity and force of will. By helping to
develop the crusading mindset, this kingdom would be partially responsible
for moving the Christian and Moslem worlds onto a course that would
consume them for the next two centuries.
The
Conquest of England
 |
By
now it should be obvious there is much more to the Norman people
and their history than the invasion of England. Nevertheless it
is this singular event for which they are best remembered. If the
common layman is asked about his knowledge of the subject he will
generally comment on Duke William the Bastard and his conquest
of England. It is a pity that the common perception of such an
energetic people is usually distilled down to this one event. Still,
it must be admitted that, while this one event should not define
the Normans, it is arguably their most significant contribution
to world history in general and the geopolitical climate of the
middle-ages in particular. Not only is the conquest of England
itself significant but the battle of Hastings is also equally worthy
of study. Very few battles of the medieval period were as long
and hard-fought, or as decisive, as the one that occurred on a ridge
some seven miles north of Hastings on October 14th 1066.
To fully understand this battle, the proceeding conquest of England
and their importance to world history, it is necessary to examine
the events leading up to them.
During
the latter half of the 9th century English kings tenuously
held onto the realm created by their predecessor Alfred the Great.
Alfred had gained a foothold in Wessex and from there his successors
continued attempts at driving back their Nordic adversaries. Despite
these successes the country was still plagued by attacks from Nordic
invaders and would-be colonists. These attacks would continue throughout
the later 10th century and into the first decades of
the 11th. Due to this unending pressure the rule of
AEthelred II, known as the Unraed or Bad Council (later corrupted
to mean Unready), was reduced to a state of irrelevancy. Fearing
the worst AEthelred sent his two sons, Edward and Alfred, to live
in the relative safety of the Norman duchy.
Then, after more than two decades of combat, AEthelreds reign came
to an end and he was deposed by the Danish-born King Cnut in 1016.
Edward and Alfred were then raised in the Norman court and this
twist of fate would prove to have far reaching consequences for
the English people. When Cnut died in 1035 his two sons, Harold
Harefoot and Harthacnut, quarreled over the royal succession. Both
would rule briefly: Harold Harefoot from 1037 to 1040 and Harthacnut
from 1040 to 1042. During the reign of Harold Harefoot tensions
were further heightened by the arrival of an invasion fleet under
the command of Edward and Alfred. Duke Robert of Normandy had shown
support for the Saxon brothers by supplying them with a fleet of
approximately forty ships.
Edward landed on the south coast and fought a battle at Southampton
but later withdrew back to Normandy due to insufficient manpower.
The unfortunate Alfred faired far worse than his brother. He landed
at Kent and was captured by Earl Godwin of Wessex. The Wessex had
grown rich and powerful under King Cnut and was all too eager to
turn the Saxon exile over to the then-reigning Harold. Alfred was
tortured and later died from the depredations committed upon him.
These events would lay the seeds of a deep and abiding hatred of
Earl Godwin within Edwards heart. At this point none of the period
chroniclers speak of any kind of widespread support for Edward among
the Saxon people. Consequently, a succession to the English throne
must have seemed like nothing more than a dream to Edward. Future
events would prove otherwise.
By
1042 Cnuts sons were dead and Edward found himself in a position
that was both surprising and perhaps a bit unenviable. With Cnuts
line extinguished Edward was now offered the English crown. Even
though he was now poised to assume the throne of England by all
accounts he knew little of the country or its people. We will
never be certain but one cant help thinking he accepted the crown
with a bit of trepidation. Edward had spent most of his adult life
as an exile in Normandy and was probably more Norman at heart than
Saxon. He knew little of the great Earls who controlled England
or the unique political structure of the countries government.
In many ways men like the hated Earl Godwin were the real power
in Saxon England. Godwins income and holdings were nearly equal
to that of the king himself and he was a man of great influence.
Such was the make-up of the Saxon system of government that the
King did not rule with complete autonomy but instead depended upon
the support, and to a certain extent the approval, of powerful Earls
like Godwin of Wessex, Leofric of Mercia and Siward of Northumbria.
Edward did attempt to rid himself of the Godwin family in 1051 when
he sent them into exile. However, the Godwins returned the following
year, armed and with a strong support cell. Due to a legitimate
fear of civil war Edward backed down. From this point forward the
kings power was terminally weakened. By all accounts this power
struggle between the King and Earl Godwin continued until the Earls
death in 1053, when the Earldom was assumed by his eldest surviving
son Harold. Godwins power was great enough that in 1045 he had
manipulated King Edward into marrying his daughter Edith. This
was an obvious way to ensure the passing of the royal succession
to the Godwin family. However, throughout the proceeding years it
would become obvious that the marriage would prove to be fruitless.
By all accounts Edward was a pious man more concerned with his God
and religion than most other things. We shall never know whether
the barren union was a result of the kings disinterest, or came
from a desire to deprive the Godwins of what they wanted most.
Regardless of Edwards motivation, his lack of providing a successor
would give the Godwin family its opportunity later in 1066.
 |
Upon
ascending the throne Edward appointed several of his Norman friends
to key positions throughout the realm. According to the Anglo-Saxon
Chronicle many of these men were highly unpopular with Edwards
subjects. One of these men, Robert of Jumieges, was named bishop
of London in 1046 and later elevated to archbishop in 1051. Robert
was then required to travel to Rome to receive Papal approval of
his holding of the see of Canterbury. If we are to believe the
contemporary Norman chronicler William of Jumieges, the archbishop
then stopped in Normandy to offer Duke William the position as Edwards
heir. William, a distant cousin, had been a boy during Edwards
exile and Norman chroniclers tell us this offer was made as an expression
of gratitude towards his Norman friends. Saxon sources are silent
on this point and tell us nothing. This was not the only instance
where Edward dangled the carrot of the English crown before a likely
subject, so we will never know how serious his motives were. The
Anglo-Saxon Chronicle tells us that Duke William traveled
to England that same year and contemporary Norman historians would
have us believe this trip was made to confirm acceptance of Edwards
offer, but this remains unconfirmed. After Edwards death on January
5th 1066 it was this supposed offer that was used as
justification for the Norman invasion of England.
Another
event which adds further mystery to the issue of succession is a
journey made to the continent by Harold Godwinson in 1064 or 1065.
French sources such as the Carmen de Hastingae Proelio, possibly
written by Bishop Guy of Amiens, state quite clearly that
the purpose of this visit was to confirm Edwards wish that William
succeed him. On the other hand English sources like the History
of Recent Events in England, written by an English monk named
Eadmer some fifty years after the battle, tell a very different
tale. According to Eadmer, Harold Godwinson had traveled to the
continent with the express intention of securing the release of
his brother Wulfnoth and one cousin Hakon. Eadmer tells us these
two members of the Godwin family had been held as hostages at the
Norman court since 1052. It seems unlikely that Harold would have
subjected himself to such risk for two relatives who had already
been in Norman custody for at least twelve years and the truth will
never be known. Regardless of his original motivation for the journey
what is known is that, while enroute to Normandy, Harolds ship
was blown ashore and he was captured by Count Guy of Ponthieu.
Ponthieu had a long standing custom of taking captives in this fashion
and a wealthy high-standing noble like Earl Harold Godwinson would
have provided quite a windfall. If contemporary sources such as
the Bayeux Tapestry are to be believed Duke William learned
of this situation and dispatched Norman emissaries to secure the
Earls release. The Bayeux Tapestry then shows Harold receiving
arms from William, possibly as an indication of Harold paying homage
to the Duke. The Tapestry goes further to illustrate Harold participating
in a campaign to quell rebels in Brittany and finally swearing an
oath of fealty on holy relics. Like most period sources the Bayeux
Tapestry is strongly one-sided in its depiction of the events.
Most sources are violently pro-Norman or pro-Saxon with very little
middle ground. What does seem certain is that Earl Harold Godwinson,
one of the most powerful men in England, and Duke William of Normandy,
a man perhaps more powerful than the king of France himself, knew
each other with something more than passing familiarity before that
fateful day in October of 1066.
We
could continue on with the complicated, and fascinating, story of
Anglo-Saxon England in the later half of the 11th century
but that is for a different time. This story concerns the Norman
people and our tale has now brought us to the most well-known one
of them all: Duke William of Normandy. William was born in 1028
as the illegitimate son of Duke Robert the Magnificent and Herleve,
a local tanners daughter. In 1035 Duke Robert died while on pilgrimage
and the young William assumed his place. Throughout the proceeding
years he would survive several assassination attempts and would
grow into a man who was as cunning as he was ruthless. It is because
of his base-born status that William was known as the Bastard
to his contemporaries. While illegitimacy was common, and did not
carry the stigma that it would in later centuries, this nick-name
was surely not a sign of affection by his fellow Normans. Williams
feelings on the matter were evident while attacking Alencon in 1051.
The defenders insulted the Norman duke by beating tanned hides in
reference to his base birth. After the town was taken the offending
parties were tortured and mutilated. By the time he sailed for
England in 1066 William was an experienced military leader, having
achieved his first victory at Val-es-Dunes in 1047 when he assisted
his nominal overlord, the French king, in suppressing a Norman uprising.
William achieved further victories over Geoffrey Martel, the Count
of Anjou, at Mortemer in 1054 and again against the French King
himself at Varaville in 1057, after the King had turned against
him. In 1066, at age 38, Duke William of Normandy was an experienced
and intractable military commander with an iron will.
 |
The
validity of William's claim to the English throne has been hotly
debated and undoubtedly this trend will continue until the end of
time. Earl Harold Godwinson assumed the English throne on the 6th
of June, the day after Edward the Confessors death. This ascension
was not automatic. Even though Harold claimed that he had been
named as the old kings successor, his appointment still required
the approval of the Anglo-Saxon Witan or Great Council.
This seems to have been readily granted as strong anti-Norman sentiments
had taken hold since the Godwins return from exile.
However, according to the Life of Bishop Wulfstan II written
by William of Malmesbury in the 12th century, Harold
was forced to make a trip to Northumbria because they would not
accept him as king. Together with Wulfstan he was able to overcome
the Northumbrian bias towards what they saw as southern decadence.
One cant help but wonder if William was overly surprised by this
turn of events. Can we see his taking Harold on campaign in Brittany
as a way to familiarize him with a potential enemys military abilities,
fully realizing that they would one day meet in battle? Can the
oath-swearing on holy relics be seen as a way to further strengthen
his own claim while attempting to neutralize an opponents? This
line of thinking may cause us to read too much into these events
of so long ago. However, when we take into account the political
savvy for which the Normans as a whole were known, and Williams
keen grasp of military affairs, it doesnt seem too far outside
the realm of possibility.
The
Saxon army that met the invading Normans on that October morning
in 1066 was a well established unified force backed by the complex
governmental system of a wealthy nation. In contrast the Norman
army was something of a cosmopolitan affair. By the time of the
invasion Duke William had already won a well deserved reputation
as a keen and successful military leader. Because of his success
he was able to attract men not only from his subjects in Normandy
and Maine but also from Aquitaine, Brittany and possibly the Norman
kingdom in southern Italy. Most scholars view this later inclusion
as a strong possibility rather than a definite fact, but if men
from the Siculo-Italian region did indeed take part in the invasion
their experience with amphibious operations would have been invaluable
to their northern brethren. The Bretons themselves were all too
eager to take part in the conquest of England. Their ancestors
had settled in Brittany after having fled the Island during the
Saxon conquest of centuries past. There can be little doubt the
Bretons saw the operation as not only an opportunity for profit
but also revenge. Upon learning of Harolds perceived treachery
William also appealed to Pope Alexander II for the one thing the
Normans never wanted to go into battle without: the Papal blessing.
The blessing was granted and a banner given to William by the Pope
accompanied the Norman army. Oderic Vitalis describes it as the
banner of St. Peter the Apostle but the exact form is unknown.
Nevertheless, the Normans sailed for England with the all too familiar
confidence that they were doing the work of God.
The
size of the Norman fleet, and the army it carried, has been widely
debated by scholars. William of Jumieges tells us that the fleet
numbered 3000 ships, while the 12th century chronicler
Wace gives a much lower number of 696. A 12th century
document known as the Ship List of William the Conqueror,
apparently written between 1130-1160 and believed to be a copy of
an older document possibly written as early as 1067, gives us a
detailed list of the ships supplied to the invasion force by Duke
Williams vassals. Men such as the Dukes half-brothers Robert
of Mortain and Bishop Odo of Bayeux, William FitzOzbern and the
bishop of Le Mans are mentioned as owing a specific number of ships.
The list sets the total owed by Williams subjects at 1000 and when
we consider the possibility that the Dukes other allies supplied
their own ships it can be seen that the fleet was, in all probability,
fairly large. Likewise, the size of the Norman army will also never
be known with any degree of certainty. William of Poitiers puts
Williams army at 60,000 men. Most modern historians have discounted
such large numbers and generally agree upon a figure of somewhere
around 7000 men. This is based upon the dubious premise that medieval
armies were invariably small. Whatever these numbers of ships and
men may have been there is one thing we can be sure of: Duke William
of Normandy was an astute military commander with a successful history.
He knew his opponent and the resources available to him. As William
does not seem to have been a man prone to rash and impetuous action
we can assume that he assembled a force large enough to have some
assurance of success. The fact that he was able to assemble a large
invasion force, and hold it together in encampment for an extended
period of time, is a testament to his dynamic leadership qualities
and organizational skills.
The
Norman fleet then waited for favorable winds and finally departed
in early evening from St. Valery on the 27th or 28th
of September. Williams personal ship, the Mora, was the
largest in the fleet and a gift from his wife Mathilda. Apparently
the Mora was faster than the rest of the fleet and she soon
left them over the horizon. At dawn the duke realized they had
left the fleet behind. When the men with him began to despair he
calmly ordered the ship to drop anchor and wait. He then sat down
to a leisurely meal, outwardly unperturbed at the course of events.
As soon as the rest of the fleet came into sight the anchor was
raised and the course of history was set. At some time before 9:00am
the fleet sighted Pevensey bay and made landfall within the lagoon.
The Normans then commenced disembarking and immediately began to
fortify the old Roman fort located there. As Duke William stepped
ashore he fell onto his hands and knees on the shale beach. This
would have been considered a bad omen by his comrades. Fortunately
either a nearby knight or the duke himself made the aforementioned
utterance about him having England in his hands and the situation
was diffused. When no serviceable road was found leading eastward
from Pevensey the decision was made to move the army to Hastings,
with the disembarked troops transiting around the lagoon and the
fleet following down the shoreline. Construction then began on
a timber motte and bailey castle that would serve as a base of operations.
 |
The
news of the Norman landing could not have come at a worse time for
King Harold and the Saxon army. All through the late summer he
had kept the fyrd on active duty along the southern coast of England
watching for the invasion he knew would surely come. He had lived
and fought with this iron-willed Norman duke and knew he was not
a man to be denied. Harold held his army together as long as possible
before finally releasing them for the needed fall harvest. When
an invasion finally came it was not from the south but rather from
the north. The Norwegian King Harald Hardrada had decided to force
his claim on the English throne and had set sail with an invasion
fleet of between 300 and 500 ships. Along with additional ships
commanded by Harolds brother Tostig, they harried the northern
coast of England, finally landing at York. On the 20th
of September, at Fulford, The invaders clashed with a northern contingent
of the Saxon army under the command of Earls Morcar and Edwin.
The Norwegians gained the upper hand and the Saxons were defeated.
Little has been written on this battle but most historians put troop
numbers at between 5000 and 6000 on both sides, and casualties were
assuredly heavy for both armies. The invaders then set about consolidating
their position and further ravaging the countryside. On the 8th
of September King Harold learned of the Norwegian landing and immediately
sent out a recall. Less than two weeks later, with whatever troops
he had mustered, the Saxon king set out northward on an epic forced-march.
The morning of the 25th of September saw the Saxon army
marching from York along the road to Stamford Bridge where the Norwegian
army was encamped. Apparently the Nordic invaders were casually
basking in the morning sun and enjoying their good fortune when
the Saxons took them by surprise. The first hint of their doom
came from the glint of weapons within a dusty cloud on the York
road. Hardrada quickly organized his army and battle was joined.
The invading army was decimated by the Saxons, with Hardrada and
Tostig among the casualties. The survivors were allowed to retreat
to York where they departed for home in less than 30 ships. Much
could be written about the battle of Stamford Bridge. In many ways
it is as significant as the later battle of Hastings and just as
dramatic. The tale is full of dramatic dialogue between the key
figures and heroic actions by individual warriors, as well as the
treachery of King Harolds brother, Earl Tostig. However, this
battle is not our primary concern here and must be left for a future
tale. King Harold must have been quite pleased at that point.
He had decisively defeated an invading army in the defense of his
realm as well as finally dealing with his troublesome brother, so
much for the Northumbrian hesitation at an overly soft king from
the south. However, his elation was to be short-lived and on the
1st of October a messenger brought word of the Norman
invasion in the south.
Upon
hearing the news Harold mustered his forces and repeated his epic
forced-march, this time southward, and reached London within five
days. Here he waited for fresh troops to be gathered before proceeding
south towards Hastings. William himself had done something unusual
for an invading army: instead of advancing inland he had consolidated
his camps at Pevensey and Hastings while waiting for Harold to come
to him. Perhaps William was concerned about overstretching his
lines of supply or being taken from ambush in the English countryside?
He also knew the timeframe for holding his army in position was
short as supplies were limited. Was William trying to provoke Harold
into an engagement by harrying the Sussex countryside? He knew
the area around Hastings lay within the Godwin holdings and that
Harold might see these actions as a personal affront. William was
aware of the English Kings capabilities from the campaign in Brittany
and as the previous battle at Stamford Bridge shows, Harold was
capable of quick action. Most of the dukes victories before and
after Hastings were possible because of cold calculated planning
on the part of the Norman lord. He does not seem to have been a
man adverse to taking chances as the invasion of England itself
proves. However, if chances were to be taken it seems that William
tried to minimize them as much as possible, as would any good field
commander. What William needed was one decisive battle and he was
about to get it.
According
to the Carmen both leaders sent monks as envoys to parlay
with the enemy. These entreaties were rebuffed on both sides and
battle was now inevitable. King Harold moved his army out of London
and, according to the E text of the Anglo-Saxon Chronicle,
arrived on Caldbec Hill at a mustering point known as the Hoar Apple
Tree on the 13th of October. Here he was joined by further
contingents of the Saxon army. Both the Carmen and William
of Jumiegies tell us that Harold attempted to take the Normans by
surprise. William of Poitiers states the duke had sent most of
his men out foraging and fought before all of his men could be assembled,
that he took communion, hung the relics Harold had sworn his oath
upon around his neck and road to battle. In reality it is very
unlikely that William had most of his men out foraging when he knew
battle was likely. William of Poitiers is obviously a very pro-Norman
chronicler. As such he endeavored to elevate Duke Williams actions
as highly as possible. During Julius Caesars accounts of his invasions
of the island in 55 and 54 BC Roman foragers figure very prominently
in the action. Consequently, in his desire to portray the Norman
duke as a Caesar-like conqueror William of Poitiers may have used
this creative device to form a comparison. William of Jumieges
more likely account states that William ordered his men to stand
by their weapons throughout the night and as dawn broke he mustered
them and marched north. Accounts of the battle itself are as widely
varied as they are uncertain. Some sources describe a battle of
tens of thousands taking place over a large area, while others describe
it as a relatively small affair confined to a ridge afterwards known
as Senlac. As with so many other things concerning Hastings these
details will never be known for certain. What is relatively certain
is that by the morning of October 14th 1066 the Saxon
army had occupied a ridgeline some seven miles north of Hastings
thereby cutting the north road to London and the Norman invaders
marched to meet them.
The
Saxon army fought in the time honored infantry shield-wall fashion.
The core of the army consisted of the Saxon nobles household troops,
known as housecarls, with the balance filled out by the Saxon fyrd
or levy. While the housecarls were paid mercenary troops they showed
extreme loyalty to their lord. The Bayuex Tapestry shows
Harolds personal guard fighting to the death over their fallen
lord while the common troops are retreating. The percentage of
these professional troops compared to the common fyrd soldiers is
unknown. The Bayeux Tapestry shows only a single archer
among the Saxon troops, so while they seem to have been present
their numbers are uncertain. Harold had disbanded the fyrd before
marching north to engage the Norwegians at Stamford Bridge. Afterwards
events proceeded rapidly enough that one has to wonder how much
time he had to reassemble the bulk of his army. Was the bulk of
the Saxon force comprised of the hard bitten mail-clad housecarls
or the less well equipped soldiers of the fyrd? We shall never
know. In contrast the Norman army consisted of three separate sections
of missile troops, infantry and cavalry. How well William could
exploit the greater versatility of his army would be limited by
the battlefields terrain. Some sources, both modern and contemporary,
are of the opinion the battleground was chosen by William, with
the Saxons being forced to battle before their army was fully assembled.
In my opinion this is incorrect. Harold Godwinson was himself an
experienced military commander with a long track record of success
throughout his ten years of campaigning against the Welsh. The
chosen battleground would seem to favor the Saxons more so than
the Normans. In front of a strong ridgeline the field sloped down
between the headwaters of two streams causing something of a bottle-neck
and while the thickly wooded nature of the area would hinder any
necessary retreat it would also prevent flanking attacks. Period
sources such as William of Malmesbury and the 12th century
Wace speak of ditches being dug and hidden by the Saxons. One section
of the Bayeux Tapestry would seem to corroborate them as
it shows Norman horsemen falling into a watery ditch apparently
lined with stakes. If these sources are accurate they would indicate
that Harold had occupied the ground first, with enough time to throw
up significant defensive works. From an offensive standpoint the
Saxons were in the stronger position.
William
seems to have had no choice other that to make a full frontal assault
on the Saxon position and the army attacked, with the French on
the left (Saxon left), the Bretons on the right and the duke with
his Norman followers in the center. Thus began one of the longest
and bloodiest battles of the medieval period. The Carmen dresses
up the battles opening with a tale of the juggler Tallifer juggling
swords before the Saxon army and then killing one of their men before
he was killed himself. Whether this event actually occurred or
whether it is merely dramatic elaboration by the Carmens
author is unknown. Guy of Amiens states that the duke ordered his
missile troops, primarily armed with crossbows, to proceed up the
ridge in the front rank. Guy tells us the duke had intended for
these archers to support the flanks of his cavalry, but due to the
terrain he was forced to use them in this fashion. While the Bayuex
Tapestry does not illustrate a significant number of archers
being present among the Saxons it does show hand-missiles, in the
form of axes and maces, being thrown throughout the battle. At
this stage in the battle we can imagine missiles of varying types
being launched by both sides in an attempt to soften up the enemy
ranks. Guy of Amiens further states that shields were no proof
against bolts from the crossbows. However, given the sloping terrain
it is uncertain just how effective these weapons were against the
Saxon shield wall. Eventually William withdrew his missile troops
and ordered his pedites, or heavy infantry, to attack. These
troops now clashed shield to shield in a straining contest of brute
strength. In the modern age we have become somewhat detached from
warfare by our technology, which often allows us to deal death and
destruction from hundreds of miles away. Not so in October of 1066.
The on-going combat would have been an intensely personal affair
with men glaring at each other over the rim of a shield, less than
an arms length away, with warriors trying to deal death with the
stroke of a Norman sword, or by cleaving an invader with the dreaded
two-handed axe. As little as a few miles distant the raging battle
would have gone unnoticed. But there on that ridgeline the crisp
morning air would have been filled with the curses of the enraged
and the screams of the dying, from men defending their country as
well as those seeking profit and conquest.
This
struggle probably continued for some time without advantage being
gained on either side, at which point Duke William would have chosen
to send in his cavalry, the armored Milites, to support the
infantry. The Bayeux Tapestry shows this cavalry as the
prime player on the Norman side of the equation. This is understandable
since the tapestry was evidently made for one of the victorious
Norman noblemen, supposedly Duke Williams half-brother Bishop Odo
of Bayeux. Whoever its owner was he was someone of note and would
have been among the mounted contingent of the invading army. In
order to please its owner the tapestrys makers would have emphasized
this facet of the battle. However, it is highly probable that the
Norman cavalry did not play the all encompassing role portrayed
on the tapestry. The fact that the battle lasted so long may itself
be an indicator of this. Many battles between Saxons and Vikings
that occurred from the 9th century onwards were contests
of opposing shield wall formations, and many of these battles supposedly
went on for hours, far longer than many medieval battles. Chroniclers
tell us that the battle at Stamford Bridge itself lasted well into
the day. Perhaps the lengthy duration of the combat at Hastings
is an indicator of a major infantry engagement? When the cavalry
engaged in combat the terrain would not have allowed them to charge
en masse. They would have been forced to approach the Saxon shield
wall alone or in single-line formation. Period evidence like the
Bayuex Tapestry, as well as accounts by William of Poitiers
and others, tell us this is exactly the tactic employed. The tapestry
shows fully armored milites attacking the Saxon shield wall
with sword and spear, the latter being used in an over-handed fashion.
If the Normans had already developed the tactic of using a massed
cavalry charge with couched lances the terrain of the battlefield
prevented them from using it. The terrain also prevented William
from using his cavalry to flank the Saxon position. Consequently,
these mounted troops were denied much of their effective shock power.
Instead they were forced to approach their enemy from a much weaker
position, attacking the shield wall in-line with a frontal assault
of spear and sword, all the while trying to avoid being cut down
by the Saxon housecarl wielding his fearsome two-handed axe. The
Bayeux Tapestry shows this terrible weapon dealing death
to both man and horse, it was surely a feared and respected weapon.
This
shield to shield stalemate continued throughout the morning hours
with neither side gaining an advantage. Chroniclers then tell us
the Breton wing of the dukes army began to crumble and retreat
due to heavy losses. As the Bretons retreated they were pursued
by contingents of the Saxon army. To make matters worse, word that
the duke had been killed now began to spread throughout the army.
Such was the importance of strong frontline leadership in medieval
warfare that a general retreat down the slope now began. William,
now in a precarious situation with a crumbling army and the enemy
on his flank, exercised the dynamic personality that had stood him
in good stead throughout his life. Raising his helmet to expose
his face, he rode among his men and assured them he still lived.
According to the Carmen at this point William rallied his
men and led them in another attack and the duke then killed King
Harolds brother Gyrth, who had unhorsed the duke with a spear cast.
The Bayuex Tapestry shows this rallying of the troops, with
Count Eustace of Boulogne riding alongside the duke and shouting
to the men that the duke is well. The tapestry also shows Bishop
Odo rallying a group of horseman who had begun to retreat from the
battlefield. We dont know how much active participation the dukes
half-brother had in the fighting. In all probability he was present
mainly to add spiritual and emotional support to the venture and
saw little frontline action. William of Malmesbury speaks of a
group of Saxon warriors who had been cut off during this pursuit.
According to him they seized a hillock during the Norman counter-attack
and by using spears and rocks killed the pursuing horsemen to the
man. Wace also describes how many Norman horsemen broke through
the Saxon line only to be killed in a concealed ditch along with
many Englishmen. He then speaks of how more Normans died in this
ditch than at any other point in the battle. The Bayeux Tapestry
seems to corroborate the basic points of the event of the ditch
massacre in panel 52. This section of the tapestry shows the aforementioned
scene of Norman horsemen falling into a ditch lined with stakes
while Saxon infantry defend a small hill. Apparently William had
been able to avert disaster but only at a high cost.
Now
that a general catastrophe had been averted William saw to the Saxon
troops threatening his flank. Wace states that William saw the
situation on the armys flank and led a group of horsemen down the
slope, where they isolated the Saxons and cut them down. Now, perhaps,
the fighting paused as men were allowed to catch their breath and
horses were watered in the nearby streams. William must have been
concerned at this point in the battle. It was now mid-day and his
army had achieved nothing more than a bloody stalemate. Armored
milites and groups of pedites could have briefly penetrated
the Saxon position only to be thrown back or hacked down. If victory
could not be achieved by days end the situation would look grim
indeed. The invaders were far from home with limited resources
and if the Saxons were allowed to retire they could then reorganize
and rebuild their forces. The duke needed a decisive victory before
the sun set. At this stage in the battle one of its most controversial
events occurred: the retreat of the Norman cavalry. William of
Poitiers claims the duke organized several feigned retreats as a
means of drawing the Saxons out of their position on the ridge.
Numbers of horsemen would charge the shield wall and then suddenly
retreat, supposedly in feigned flight. This action caused groups
of Saxons to charge in pursuit, at which time the Norman cavalry
would wheel around and counter-attack, thereby cutting down their
pursuers. Anti-Norman scholars stand by the opinion that these
movements were indeed genuine retreats and William of Poitiers is
simply attempting to cover up the less than stellar actions of his
countrymen. In my opinion this is incorrect and the military history
of the Normans themselves supports this position. These same tactics
were used several times by the Normans in the years preceding Hastings.
The maneuver of feigned retreat was used with success at Arques
in 1052, as well as Messina in 1060. To make the claim that Norman
cavalry was not capable of these maneuvers is to deny the history
of the people themselves. As we will later discuss, Norman military
units, either cavalry or infantry, were tightly run professional
machines. These men had trained together for years for exactly
this kind of operation so the concept of a feigned retreat is well
within the realm of possibility.
By
late in the afternoon the Saxon army still held their position on
the ridge. Their ranks had been thinned but so had those of the
invading Normans. Both men and horses in the Norman ranks would
have been reaching the limits of their endurance. William of Poitiers
relates how the duke himself had three horses killed beneath him
throughout the course of the day. Wace also provides exciting bits
of detail from this stage in the battle: how Duke William had his
helmet dented by the blow from a Saxon axe, and how Robert Fitz
Erneis managed to ride into the English lines and take the standard,
only to be cut down by the huscarls guarding it. The area around
the ridgeline would have been littered with the bodies of the dead,
causing a further hindrance to the attackers. While things seemed
desperate for the invading Normans they were equally so for King
Harold and his countrymen. Many of them had fought the Norse at
Stamford Bridge and perhaps Fulford as well. To say these brave
men were exhausted would probably be something of an understatement.
They may have been as hard as the iron protecting them but previously
fighting two major battles, as well as twice marching the length
of England to engage an invading army, was surely proving to be
too much. Both of Harolds brothers, Gyrth and Leofwine, had now
been killed sometime during the day. As the two were surely Harolds
main subordinates in the Saxon army the king would have no longer
had a complete sense of command and control with which to direct
his troops. According to Wace, and Henry of Huntingdon as well,
the duke now concentrated his archers upon the English position
in preparation for the final assault. The Bayuex Tapestry
indicates this by illustrating many archers in its lower band at
this stage in the battle. How organized this final assault was
is debatable. The troops would have been intermixed due to the
long duration and severity of the fighting and whether the last
attack was a coordinated affair or a general melee can only be for
the individual reader to decide. When the death of King Harold
finally came it was also the death knell for the defending Saxons.
Harolds death has been one of the most hotly debated aspects of
the battle. The commonly held opinion is that Harold was killed
by an arrow through the eye, as supposedly depicted on the Bayeux
Tapestry. Unfortunately the tapestry has been repaired on more
than one occasion throughout its existence and the scene depicting
the kings death is one of these areas of repair. Consequently,
the figure that seems to be grasping an arrow protruding from its
face may have originally been wielding a spear. Other theories
hypothesize that the figure being cut down to the immediate right
of this scene actually depicts Harold being slain. William of Malmesbury
concurs with the arrow theory while Wace follows along but in more
colorful detail, with the king being struck by the arrow then being
given a sword blow on the thigh while lying prostrate. The Carmen
gives Duke William the honor of breaking through the lines and
striking down his enemy personally.
Regardless
of its manner, Harolds death signaled the battles end. Members
of the fyrd began to break away in retreat while the housecarls
of Harolds personal guard chose to stand and die with their king.
By the time the sun set the battle had turned into a complete route
and the duke was forced to recall his pursuing troops due to the
falling darkness. Legend has it that William then returned to the
battlefield where he pitched his tent among the dead. The Norman
dead were recovered for burial but the Saxon slain were left where
they lay, as a carrion feast unless family members came to claim
them. Unlike most of their countrymen the bodies of Harolds brothers
were recovered. However, the kings body had been so badly abused
as to be unrecognizable. Because of this William sent for Harolds
common law wife, Edith Swan-Neck, so that she could identify his
body by marks known only to her. The body was then taken to the
dukes camp where Harolds mother, Gytha, supposedly offered William
the bodys weight in gold for its return. William refused and
his Norman comrades joked that Harold should be buried on the shore
he had tried in vain to defend. Other sources state that William
allowed the body to be buried at Waltham Abbey in Essex and today
a plaque marks the spot of King Harold Godwinsons supposedly final
resting place.
After
the battle William returned to his base at Hastings where he spent
several days regrouping and then moved on Dover. Enroute to Dover
he sent troops to Old Romney for retribution. Apparently two ships
from the invasion fleet had been blown ashore there and the crews
had been killed by the local militia. The duke undoubtedly dealt
with these citizens in the same ruthless fashion he had displayed
in the past. After fortifying Dover William moved on to Canterbury
where its citizens submitted. The duke then continued to take
control of the countryside around London until the city itself finally
capitulated and William, Duke of Normandy, now a conqueror rather
than a bastard, was crowned King of England on Christmas day in
Edward the Confessors Westminster Abbey. There were still pockets
of resistance throughout the country and the total conquest of England
was not yet complete. After the country seemed relatively secure
William returned to Normandy in 1067. He had left William FitzOzbern
and Bishop Odo in charge of the country but rebellions immediately
began to flare up after his departure. The King then returned in
1068 and marched on the rebellious city of Exter with contingents
of the Saxon Army already under his command. William continued
to deal with small cells of rebellion, as well as an invading Danish
fleet of up to 300 ships. The Danes were harassed until they withdrew
and Wiliam used the centuries old practice of Danegeld to buy them
off. Evidently even the iron-handed conqueror was not above the
realities of political expedience. In 1069 a major rebellion flared
up north of the Humber River and William marched to York. The King
now exercised his cruel will in an event that has come to be known
as the Harrying of the North in which the king adopted a scorched-earth
method of pacification. Such was the severity of the devastation
that, according to Orderic Vitalis, 100,000 people died of famine.
This figure is probably an exaggeration. However, the devastation
was great enough that the area is listed as uninhabitable in Williams
Domesday survey of 1086. By 1071 the pacification of England was
complete and the country was forever changed. The Normans introduced
new systems of government and finance to England and a new hierarchy
replaced the old Saxon witan. England was a rich country
and King William I added those resources to an already powerful
Norman realm. After the conquest of England was secure William
encountered far more contention on the continent among his Norman
subjects than he did upon the island nation. Upon his death in
1087 he left a rich and influential kingdom to his sons. In an
age where rulers were judged primarily upon their military abilities
William the Conqueror can surely be seen as one of the most capable.
While he may not be one of the most beloved kings in English history
(or not loved at all) he was certainly one of the most efficient
rulers the country has ever had.
The
battle of Hastings itself was unique for several reasons. It was
unusually long when compared to most battles of the period. You
will not find a battle that was harder fought or closer run than
the events which took place on that ridge in the English countryside
nearly a millennium past. It was also incredibly decisive, more
so than William could have probably hoped for. In one stroke he
had eliminated most of his political and military rivals and this
made the quick operations of consolidation possible. If Harold
or the other Saxon nobles had survived organized resistance who
have undoubtedly continued for quite some time, the total nature
of the victory prevented this. The Norman Conquest also took England
out of the Nordic sphere of influence and made the country a significant
player upon the European stage. One could claim that the English
empire began on the blood strewn slopes of Senlac Hill. The common
belief is that Hastings represents a clash of old and new methods
of warfare, of the giving way of infantry combat to superior cavalry
tactics. This is really a gross oversimplification of the issue.
If their methods were indeed superior why did the battle last from
nearly sunrise to sunset? At Hastings the outcome lay in doubt
right up until the last moments of the battle. This in itself does
not support the theory of total superiority in Norman arms and tactics.
If cavalry is superior why did infantry combat again rise to dominance
in the later medieval period? In reality there was little difference
in Saxon and Norman equipment. Both armies had an elite group of
professional soldiers at their core who seem to have been equipped
in nearly identical fashion, according to the Bayeux Tapestry.
Even if the Norman cavalry was a superior tactical instrument its
input wasnt the deciding factor, as the terrain at Hastings limited
its effect. If Norman effectiveness cannot simply be attributed
to factors of equipment and tactics how were they so successful?
Can other things such as leadership, loyalty, aggression, opportunity
and even luck be factors? Some of these questions can never be
fully answered and must be left to the sands of time. However,
hopefully we can gain a better understanding of Norman success as
we discuss their military methods.
The
Norman Military Machine
 |
During
the 11th century Normandy operated under the medieval
form of government known as feudalism, or enfeoffment in exchange
for obligation. Within this system a knight would be given a grant
of land in exchange for service to his overlord. In the strict
military sense, which is our focus here, the knight would be granted
a fief, or fee, in return for a specified length of military service
per year. From a military standpoint this system of government
has received far more attention than it deserves. Exactly how much
did this feudal system contribute to the Norman capability to wage
war? Were these feudal vassals the true backbone of the Norman
military machine? In his study of the knights fee historian J.H.
Round could only find three instances where the feudal host was
summoned to full service. The payment of scutage, or money in place
of physical service, seems to have been more common. From this
we can see that, while feudalism did indeed play an important role
in administration and government, it was not a significant factor
in Norman military operations. Like most societies during the medieval
period Normandy was a society organized for war. Most grievances
would have been resolved through military means, even if this only
meant intimidation through the physical presence of an army rather
than actual combat. A strong and capable military structure was
needed because of this negotiation through force approach. If
the feudal host did not serve as the backbone of Norman military
operations what did?
The
true core of the Norman army was the familia regis, or kings
military household. The troops of the familia were professional
mercenary troops who were paid for full-time military service.
It must be understood that, during the 11th century,
the term mercenary did not carry the negative baggage it does
today. The modern image of the mercenary is that of an untrustworthy
and unscrupulous killer for hire. In contrast the paid members
of the familia often showed intense loyalty towards their
lord and their lord to them. The loyalty displayed by the familia
was often far stronger than that shown to a lord by his feudal
subjects. Even when mercenary troops were not officially part of
a lords familia they often displayed a sense of professionalism
and loyalty far greater than their feudal counterparts. During
the siege of Bridgnorth in 1102 Robert of Bellemes garrison was
made up of a combination of mercenary and feudal troops. Unknown
to either Robert or his mercenaries, the feudal members of the garrison
cut a deal with the besieging army and surrendered the castle, much
to the dismay of the mercenaries and surely to Robert himself.
William FitzOzbern, one of the closest confidants of William I,
was well known for bestowing lavish gifts upon the members of his
familia, in spite of incurring the kings displeasure over
what he saw as excess. Upon his deathbed Henry I, the Conquerors
son, professed concern about the welfare and care of his familia
troops. Such was the bond of loyalty that one of Henrys last
thoughts concerned these comrades in arms. The combination of money
and shared loyalty created a strong bond between a Norman lord and
his personal troops. A lords feudal subjects often expressed contempt
for these paid soldiers, since they saw them as inferior and of
base station. Apparently the familia often showed equal
contempt for the lords noble subjects, who they saw as dishonest
and without honor. This could undoubtedly lead to friction within
an army and it would take a leader as strong as many of these Norman
lords to maintain control. To place the familia in a modern
context we may view them as the professional active-duty arm of
the Norman army, with the feudal host as a form of reserve that
would be called into service in time of greater need. The presence
of familia troops in post-conquest England doesnt seem to
have been as great as in continental Normandy. The size of a Norman
army was limited due to issues of transport and supply, as such
the Saxon fyrd continued to supplement Norman troops in England
after 1066. A soldier of the Norman familia shared
much in common with the Saxon housecarl. The principals of service
and loyalty were much the same. Perhaps this similarity is due
to their common roots in the Nordic and Germanic areas of northern
Europe. As such, the professional soldiers of the familia
formed the truly effective arm of Norman military might.
I
have tried to avoid using the term knight and will continue to
do so. In later centuries the scope and basis of knighthood would
change considerably, using it as a descriptor here may lead to a
false impression of who the Norman warrior really was. The Norman
soldier took two basic forms: the milite and the pedite.
In their strictest interpretations these are translated into soldier
and infantry respectively. The term equites can be translated
into cavalry, although milite seems to have served this
definition in the broader sense. In Stephens reign a miles
was defined as one who held a knights fee, hence the use of miles
as a descriptor for knight. Consequently, we will define the
miles, or milite, as a mounted soldier and the pedite
as an infantryman. During the 11th century these terms
do not seem to have been used exclusively to describe those of noble
birth, as we would come to expect from later definitions of knighthood.
A mans equipment seems to have been the defining factor. If a
man possessed the required equipment of mail hauberk, helm, sword
and horse he could be considered a milite. In an age where
the horse was a main symbol of wealth and status, undoubtedly most
of the feudal nobility would have occupied this role. Still, a
professional soldier of the familia may not have been of
noble birth but if his success allowed him to possess the required
equipment he could also fill the role of the miles. Likewise,
a senior infantryman might possess helm, hauberk, etc. yet still
play the part of a pedite. The fact that Norman milites
often dismounted and fought as pedites, or organized infantry,
further muddies the waters between these two definitions. Siege
warfare was a far more common event than large set-piece battles
like Hastings, which tended to be very costly affairs in both men
and material. Consequently, the Norman miles spent quite
a bit of his time fighting on foot. Henry I made good use of dismounted
troops at the battle of Tinchebrai in 1106. Henry was besieging
the castle when his brother Robert arrived with an opposing relief
force. Henry dismounted a large number of his milites and
used them to support the infantry, to good effect. The common perception
of the medieval infantryman as a simple peasant with a spear is
a long standing fallacy. While it is true that they were generally
less well-equipped than their mounted counterparts, they still played
a crucial role on the battlefield. Infantry could, and often did,
play a significant role in combat. William I knew the value of
infantry and recruited large numbers of them for the invasion of
England. If these professional mercenary pedites had not
been present at Hastings the battle would have gone quite badly
for the Norman cavalry. The Normans willingness to adapt to the
tactical needs of the situation, as well as having the capability
of fielding a cohesive and professional military force, cannot be
overemphasized. The fact that Norman leaders were able to consistently
command their mounted troops to dismount and fight among the infantry
is also an indicator of their typically strong leadership. A man
on horseback would have been seen as having the greater chance at
fame and reward, as well as being able to retreat if the battle
went badly. Only a leader with full command and control of his
army could have accomplished this on such a routine basis.
Evidently
the familia member was responsible for initially supplying
his own equipment, with lost or damaged items being replaced by
his lord as part of the service agreement. A prosperous and successful
familia soldier, or feudal noble, would have possessed a
mail hauberk consisting of many thousands of interlinking, riveted,
iron rings. Mail was very time consuming to make and consequently
quite expensive. Given its cost, the percentage of soldiers actually
possessing mail at any given time is open to debate. While much
of the surviving period artwork depicts large numbers of mail-clad
warriors, its use undoubtedly varied with individuals as well as
within familia units. Still, possessing a mail hauberk
was one of the requirements for service as a miles, so when
medieval muster rolls list large numbers of these troops we might
assume that its use was fairly widespread. Whether or not a padded
garment (gambeson, aketon, etc.) was worn beneath armor during the
11th century is a hotly debated subject within historical
circles. There is no evidence for this until well into the 12th
century. However, the effectiveness of a defensive system utilizing
mail is much increased if padded underclothing is worn. An iron
helmet, consisting of a conical skull and a simple nasal guard,
would have supplemented the hauberk, although quite a few examples
of period artwork show helms without nasal guards being used. In
spite of its obvious popularity very few examples of this type
of helmet survive. Nevertheless we can extrapolate from the surviving
specimens that the helm took two basic forms: a segmented type in
which individual plates were riveted together to form the skull,
known by historians as the spagen form of construction, and
the more expensive variety in which the helms skull was raised
from a single piece of iron. The nasal guard itself could either
be integral to the helm or riveted in place. Through period artwork
it is obvious this seemingly simple helmet was quite popular for
several centuries. It provided good protection for the wearer as
well as good visibility and no hindrance to breathing. If contemporary
sources like the Bayeux Tapestry are any indication this
type of helm was the standard of the period. The soldiers final
piece of defensive equipment was the shield. The preferred shield
for Norman use seems to have been the so-called kite, or teardrop,
shaped shield, although the earlier round variety did remain in
use. Made of wood and covered with cloth or perhaps leather, this
design offered increased protection for the users legs, both mounted
and dismounted, and by the late 11th century it seems
to have become the preferred type.
The
pattern-welded swords of the migration era and early Viking age
had now given way to improved methods of manufacture. Smelting
techniques had improved to the point where homogenous steel blades
were now easier to produce, with no loss in function, and by the
11th century the more complicated manufacturing process
had been replaced. The sword was still of a cutting dedicated design,
with a broad, flat blade. However, as the period progressed longer
blades with an increased profile taper began to be introduced.
By the 11th century swords had become something of a
general-issue item, no longer strictly the province of high born
warriors of note. This last point may be reflected in the more
austere appearance of many surviving specimens from the 11th
century, although the Normans themselves seem to have been more
reserved in their general tastes, so this may only be an aesthetic
issue. The horse was the most expensive piece of equipment owned
by the miles. As with modern work animals, such as the law
enforcement canine, only certain specimens were suitable for use.
A certain type of spirit and temperament was needed for a war mount,
not every horse possessed such traits. Once the horse was selected
for these duties, like its rider, it would undergo extensive training
to make it suitable for the task. The miles would then ride
this fully trained mount using a saddle with fully extended stirrup
leathers that left the rider literally standing in the saddle, as
well as a high front and rear cantle that did a good job of locking
the rider in place. The end result was the melding of horse and
rider into a stable, secure, and lethal weapons platform.
How
the Norman soldier trained to use this equipment is itself cause
for much debate. There is the long held opinion that medieval weapons
were crude and brutish affairs that relied on brute strength and
bludgeoning power for their effectiveness, this viewpoint is incorrect.
Norman equipment was anything but crude and barbaric. While the
various items of a Norman soldiers kit may look uncomplicated to
the modern eye, much time and effort was spent in their design and
manufacture and every item was well suited for its intended purpose.
The sword itself was a subtly complex killing instrument that, when
properly made, possessed dynamic handling qualities perfectly suited
to the required task. Surviving manuscripts from the later medieval
period illustrate complex and dynamic methods of use. There is
no reason to believe the training methods of earlier centuries were
any less-complex. Likewise, modern medieval historians have found
that training a horse to perform the task of running a tilt is a
complex and time consuming affair. We can assume that training a
horse to operate in tight formation, as well as performing in the
confusion of the battlefield, would be even more so. While these
men were professional soldiers, and in spite of the aforementioned
complexities of their profession, it is unlikely that they attended
any kind of formalized school as we define it today. From a very
young age, men of medieval society were trained in the methods of
warfare. Training with weapons began as soon as the individual
was old enough, likewise with horsemanship. Norman cavalry operated
in groups of 25 to 50 men known as conrois. Unity and timing
would have been essential when working in a closely packed cavalry
formation. Therefore, it is logical to assume that, in order for
these skills to be properly developed, training was conducted in
a similar group fashion. Young men may have been trained in the
martial methods by assigned members of their lords garrison or
court, perhaps a designated master of arms or castellan. The popular
sport of hunting from horseback was itself a means of military training
used to hone the warriors equestrian skills. Medieval societies
were communities organized for war and life itself was their training
ground. By the time a man reached adulthood the use of his mount
and weapons must have been second nature.
 |
While
Norman military equipment was state-of-the-art for its time, it
was not significantly different than that used by other European
countries, nor was there a huge difference when compared to that
used by their Moslem adversaries in the Italian campaign. The Bayeux
Tapestry itself shows little difference in Norman and Saxon
equipment. The Normans surely made the most of cavalry warfare.
However, it would seem they simply adopted the small-unit cavalry
tactics used by 10th century Byzantine armies. How then
were the Normans so successful in their conquests?
One classic theory of Norman superiority relies on the invention
of the stirrup. The main problem with this theory is that it cannot
explain why infantry returned to dominate the field later in the
fifteenth century. Why were formations of Swiss and German pikemen
able to handedly defeat the best of European chivalry if cavalry
was inherently superior? The earliest date considered for the stirrups
invention is around 500 AD. By the 11th century the
Normans were not the only people using the stirrup so this cannot
be seen as any kind of special advantage. Also, if cavalry was
the ultimate medieval weapon why did Norman troops routinely dismount
and fight on foot? In reality cavalry is effective against other
cavalry or disorganized infantry. In ages of cohesive infantry
tactics, such as those of Greece and Rome, cavalry served mainly
in a supporting role, this had little to do with a lack of stirrups.
The battle of Hastings itself, as already mentioned, shows that
massed infantry formations are quite capable of standing against
cavalry attacks for extended periods of time. Therefore the use
of things like the stirrup, couched lance and massed cavalry tactics
cannot be seen as any kind of Norman secret weapon.
To
what then can we attribute their success? As we have seen, the
core of any Norman army consisted of a professional military arm.
Yet it would be rather narrow-minded for us to assume they were
they only ones who possessed such a force. We have already seen
that the Saxon army itself was built around a similar group, so
the Normans were not totally unique in this aspect. Norman society
was built around the concept of warfare and their elite saw themselves
as a warrior society. Still, the medieval world in general was
a violent and war-strewn place and many of their enemies also possessed
cultures with a warrior ethos. In areas like Sicily we may attribute
Norman success to the political division and disunity that existed
within the local populace. However, as with the conquest of England,
the Normans sometimes faced a united enemy so this aspect cannot
be seen as a catch-all solution. In my opinion Norman success can
be attributed to two things that are far less tangible: leadership
and luck. Throughout the 11th century Norman leaders
showed themselves to be aggressive and capable. Nearly all of them,
from the cruelly charismatic Robert Guiscard to the iron-fisted
William of Normandy, possessed a dynamic and forceful personality
that allowed them to maintain complete control of their troops in
the field. Not only do they seem to have led from the front but
they also believed in amply rewarding their men for loyal service,
this practice can only have served to strengthen the motivation
of their troops. When they did face rebellion it often came from
their troublesome feudal subjects and relatives, whereas the troops
of their familia seem to have been consistently loyal. In
the modern world we tend to see law and religion as things which
restrain us and govern our behavior. The Normans were big proponents
of law and religion. However, they seem to have viewed these things
as tools that could be bent to their personal use, not as legal
or moral shackles. When Norman leaders decided to exercise their
ambition they did so with an unwavering determination that was unsurpassed
by any other people in the 11th century. They were also
lucky. In spite of their military and political abilities, all
too often they were outnumbered and isolated from support. In many
instances where logic should have dictated a loss the Normans were
victorious. Most capable military commanders have given luck at
least partial credit for their success and the Normans seemed to
have had more than their fare share. If there is any motto that
could apply to them it is the old Latin phrase Carpe Diem.
Throughout the 11th century the Norman people did indeed
seize the day and in doing so made it their own.
A
Modern Norman Interpretation
 |
Now,
at last, this long and winding road has brought us to my own part
in the tale. While many medieval enthusiasts are fascinated by
the plate harness of later centuries it is the age of mail that
has always fascinated me. As a child I possessed several old volumes
of the tales of King Arthur. These books were profusely illustrated
with woodcut illustrations of Arthur and his knights. The figures
in these plates all wore the characteristic conical helm and mail
hauberk of the 11th century. I spent many an hour gazing
intently at those illustrations and I have no doubt this had a huge
impact on my personal vision of the medieval knight. The Warlord,
a movie starring Charlton Heston was also one of my favorites and
continues to be so to this day. This movie is also full of my favorite
vision of the medieval warrior, that of Normans in mail. I have
long desired to create an accurate interpretation of 11th
century Norman kit and have attempted this on several occasions
with varying degrees of success. Early in the summer of 2005 I
decided to make the attempt once again.
In
all honesty this project didnt start with a specific goal. I didnt
begin with a clear cut A to Z process in mind. I initially purchased
a mail hauberk from an on-line source and from this one decision
the monster was born. While surfing around the internet I happened
to come upon a mail hauberk being offered for an affordable price
by Wholesalearmor.com. The advertisement listed the hauberk
as being manufactured from 16 gauge flat rings, secured with round
rivets. Given the cost of quality mail the price was rather cheap
and if nothing else it would serve as a diverting project. In years
past I had made several mail projects with the usual, butted, round-wire
rings. I had never been completely satisfied with the appearance
or durability of butted rings. Consequently, I decided to give
riveted mail a try. A truly accurate custom-made hauberk, while
beautiful, will always be far beyond my financial reach so this
one would have to do. In short order I made the purchase and within
the week I was in possession of one Indian-made mail hauberk. As
soon as I had the armor in hand I began to think of ways to improve
it. The idea of the mail serving as the basis of a complete interpretation
soon began to take shape. When the decision was finally made to
turn the project into a full-blown interpretation several issues
had to be resolved. The main question was, How much am I willing
to spend? This is the primary consideration of any re-enactor
or living historian when starting a project like this one. Many
of the items necessary may have to be custom made and even quality
production examples can be costly. It is very easy to spend huge
amounts of money on accurate equipment and, as with most hobbyists,
expense was a main concern. The next question in need of resolution
was, How accurate do I want to be? The 11th century
is one period that really suffers badly in re-enactment circles.
When this period is being portrayed far too much of the equipment
appears to be thrown together in a haphazard fashion, with little
thought to overall look or proportion and the entire appearance
of the interpretation tends to suffer. On the other end of the
spectrum is the ultra accurate high fidelity approach. With this
method the attempt is made to make the persona as accurate as possible,
with much thought being given to everything from cloth dye and paint
to hand-stitched garments. In the end I decided on a median approach.
Historical accuracy would be given precedence in the choices of
material, color, overall composition, etc. However, for the sake
of time management things like modern paints would be used and the
clothing would be machine stitched. My hope was to build an interpretation
that would be convincing yet affordable. This approach would be
taken with the idea that any a-historic details could be changed
and improved over time.
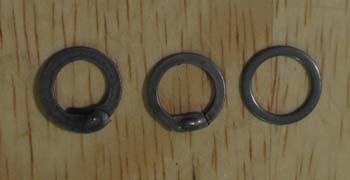 |
The
hauberk itself required the most time and effort to bring it to
a reasonable level of appearance. The standard method of mail construction
during the 11th century seems to have been the use of
alternating rows of solid and riveted rings, with the riveted rings
being round in cross section. The new hauberk was entirely made
of flat, riveted, rings so there was nothing to be done in that
respect. However, there was still much that could be accomplished
to improve its appearance and fit. The first order of business
was to remove the zinc plating that covered the mail. While this
kind of coating provided an effective way to protect the mail against
corrosion it was neither attractive nor historically accurate in
appearance, so the decision was made to remove it. I did this by
placing the mail in a bucket of muriatic acid. Within seconds the
zinc was removed from the mail and the acid was neutralized by placing
the mail in a second bucket of water and baking soda. (The author
does not encourage the use of hazardous chemicals and is only relating
his experience for observational purposes. This process is not
recommended)
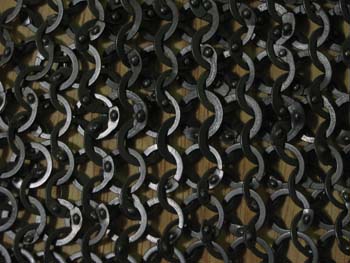 |
Once the zinc plating was removed the appearance of the mail improved
considerably. I then beganclosely examining the hauberk and replacing
any rings that were missing their rivets, or possessed rivets that
were not properly set. For these repairs I used flat rings and
wedge rivets that I purchased from Forth Armoury. After
these repairs were complete I starting performing major changes
to the hauberk. Most modern production mail consists of nothing
more than a straight tube with sleeves and a hole for the wearers
neck. Original mail armor was tailored to the wearer much like
a fabric garment would be. I have never encountered modern, mass
produced, mail that possesses these features. This is understandable
given the price point. However, the result is a mail garment that
doesnt fit the way it should, be it a hauberk, coif, or chausses.
Not only does this method of manufacture ruin the physical appearance
of the mail, it also hinders the wearers ease of movement and results
in unnecessary weight.
I
then set about performing the two most time consuming aspects of
this project: lengthening and expanding the hauberks skirt. In
its original form the hauberk was a bit too short for my taste.
The skirt only extended to mid-thigh and I felt it should reach
to the knee for a proper Norman look. Lengthening the skirt was
easy enough to do but expanding it required some consideration.
If I had been constructing a hauberk from the ground up I could
have simply added expansion rings throughout the skirt. However,
since I was dealing with an assembled garment a more complicated
process would be necessary. I knew that increasing the skirts
length would require me to put a slit in the front and back, this
wasnt necessary in its original, shorter, form. Unfortunately,
simply increasing the length without expanding the skirt would result
in the slits spreading out into an, exaggerated, inverted v-shape.
This is a common trait in most modern mail efforts and something
I wanted to avoid. I finally decided to insert four gores into
the skirt, one each in the front and back, as well as one on each
side. These would be triangular shaped gores, six inches wide and
twelve inches high. When this was finished I split the front and
back gores up their center. When I had finished I examined the
hauberk and felt there was still too much spreading of the front
and back slits. I then added four more trapezoidal sections to
the slits, with one on each side of the slits, front and back.
This did a good job of closing the slits and I was happy with the
result. After these alterations were complete I lengthened the
skirt by approximately four inches. I also continued the skirts
expansion by adding three to four expansion rings to every row.
As I previously mentioned, 11th century mail seems to
have been made from alternating rows of riveted and solid rings.
While doing most of these major alterations I decided to follow
suit. I purchased solid punched rings from The Ring Lord,
an on-line mail supply source. Utilizing these solid rings cut
down the required work time to a considerable degree. For anyone
wishing to tackle an entire mail project I highly recommend using
this method. The final two alterations to the hauberk involved
closing up the neck opening and shifting it to a more biased-forward
position, as well as inserting a large diamond shaped gore into
its back, positioned to lay between my shoulder blades. The insertion
of this gore eliminates any binding along the shoulders during violent
movement and aids considerably in comfort. There is still a bit
of binding in the hauberks armpits and eventually I will insert
gussets in these areas to eliminate this. These alterations took
over two months to complete but in my opinion it was well worth
the effort. The hauberk now possesses a much more accurate appearance,
as well as being far more comfortable to wear and easier to move
in. As I have already mentioned, it is debatable whether padded
garments were worn beneath mail during the 11th century.
I am of the opinion that some kind of padded garment was probably
worn. Eventually a gambeson made from appropriate materials will
be added to the kit. However, for now I will have to do without
one.
 |
The
second element of my kit, and probably the most controversial, is
the coif. The controversy lies with the fact that I have chosen
to use a separate coif. The current popular opinion in historical
circles is that, during the 11th century, the coif was
an integral part of the hauberk. While this does indeed seem to
have been the newest development at that time I doubt that every
single man wore a hauberk of this design. A separate coif is specifically
mentioned in 7th century Byzantine sources, so we know
it was in use long before the 11th century. The Bayeux
Tapestry is often cited as primary evidence of the integral
coifs predominance. However, this is far from the only style portrayed
on the tapestry. While many figures seem to be wearing an integral
coif there are also quite a few who seem to have a clear delineating
line between the coif and the hauberk. This feature may be illustrative
of separate mail garments. There are also figures that appear to
be wearing no coif at all, but rather some kind of soft hood, perhaps
made of leather or cloth, beneath their helm. There are even a few
figures that are bare-headed, with no evidence of an attached coif
hanging from the hauberks neckline. The Bayeux Tapestry
is in itself a limited source of information. Its rather crude
medium limits the amount of detail possible and thereby limits its
value as an historical resource. However, there is clear evidence
in the form of period statuary that illustrates Norman soldiers
wearing hauberks with integral coifs, as well as the characteristic
bib ventail. So, while I freely admit that this seems to have
been the state-of-the-art system during the 11th century
I dont believe it was the only one. In the end one of the major
factors in this choice wound up being cost.
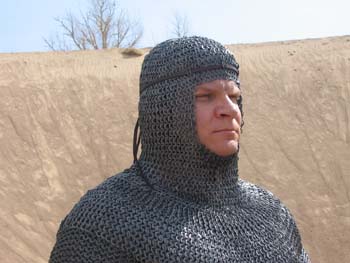 |
I intend to use the individual mail garments in other interpretations,
because of this versatility is a must, attaching the coif to the
hauberk would seriously limit this versatility. Eventually, time
and money allowing, I will probably add an integral coif to this
hauberk while using the detached coif for other purposes but for
now this system will suffice. For my use I chose a coif manufactured
by Get Dressed For Battle, a relatively new company based
in England. I purchased the coif through Historic Enterprises,
a company here in the United States. The coifs price was equal
to that of the original hauberk but the quality was also much higher.
Upon examining the coif I found no evidence of missing rivets and
for the most part the coif exhibited clean workmanship. Unfortunately
it arrived with a blackened oil finish which, while attractive,
was very dirty and didnt match the hauberk. Fortunately, removal
of this finish did not require the use of hazardous chemicals.
Instead it only required an overnight soak in vinegar to take the
coif down to bare metal. While the initial quality of the coif
was acceptable it did require alteration, for this I purchased loose
rings and wedge rivets of the same size from Get Dressed For
Battle. The coifs facial opening was originally quite large.
When worn the lower edge of the opening hung down almost below my
tracheal notch. This resulted in a fit that was far too loose.
To remedy this I used the loose rings to close up the facial opening
to a more appropriate fit. I also added a leather strap around
the forehead of the coif, when tied in the back this helps to secure
it to my head during vigorous movement. A padded arming cap made
by Museum Replicas Ltd. is currently being worn beneath the
coif. This will eventually be replaced with one made from more
appropriate materials. Both the hauberk and coif were treated with
vinegar after the alterations were complete. This caused the new
rings to oxidize, thereby matching the coloration of the original
rings.
 |
The
last piece of armor needed was a helm; surprisingly this was the
hardest item to find. Purchasing a custom made helm was an option.
However, since affordability was an issue I decided to use a production
version. Unfortunately, finding a suitable version of this outwardly
simple helm proved to be a difficult task. Most production versions
are too large and lack the shape and proportion of the originals.
All too often the end result is a helm that looks like nothing more
than an overly large metal cone. I finally turned, once again,
to Get Dressed For Battle. I examined the companys available
helms and settled on their Olmutz model. This model is based upon
an original example that was discovered in Olmutz, Moravia. There
are very few surviving examples of this type of helm and the Olmutz
specimen is one of the best preserved. I have always preferred
the smooth one-piece construction of this helm over the segmented,
or spangen, style of construction found in other examples.
I had initially attempted to acquire this helm through a US distributor.
Unfortunately this source fell through so I cancelled the order.
Stephen Brown, the owner of Get Dressed For Battle, apologized
for the mix up and offered to ship the helm directly to me and pay
for the shipping himself. Stephens kind gesture literally cut
the cost of the helm in half, something I was very grateful for.
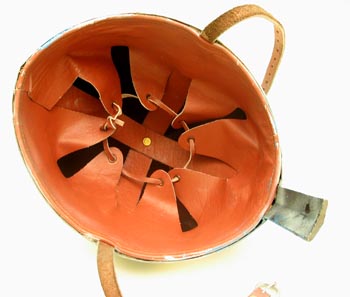 |
When
the helm arrived I was quite happy with it. The helms shape and
proportion are quite nice, much better than other examples found
at this price point. Most mass-produced helms of this type will
feature thinner 18 gauge steel in their construction. In contrast
the GDFB helm uses stronger 16 gauge steel. The skull of
the helm is shaped from two pieces of steel that have been welded
together to simulate one-piece construction. This construction
method is used to maintain an affordable price point and does not
affect the helm aesthetically. The helms nasal guard also has
an additional piece of 3mm steel welded to its underside as an
added reinforcement. This is a functional helm not merely a display
piece. The final feature is the welcome addition of a leather suspension
system, something missing from most helms in this price range.
The components of the suspension system are riveted together while
the entire unit is glued to the inside of the helms rim. The glue
is quite secure, to the extent that I believe the suspension would
be damaged if an attempt were made to remove it. However, I will
probably secure it with rivets sometime in the future. While the
appearance of the helm was satisfactory I felt it needed something
to give it more visual appeal.
The
Bayeux Tapestry portrays helms of this type in a multitude
of colors, perhaps indicating the helms were painted. The painting
of armor is a long standing practice that dates back to ancient
Greece. Painting is an economical and easy means of protecting
armor from the elements. I have long felt this may have been a
common practice during the 11th century so I decided
to paint the helm. I had originally considered using traditional
milk paint but due to coast and convenience I settled on modern
spray paint. Even though modern paints were to be used the colors
still needed to be something that would not have looked out of place
in the period. I chose the basic colors of blue and white, both
because of their basic nature and because their use doesnt seem
to be as widespread in living history circles, when compared to
colors like red, yellow, black, etc. After the helm was primed
and painted several coats of clear finish were applied, this resulted
in a hard and durable finish that has resisted chipping. The end
result is a helm that features a nice sense of shape and proportion
as well as aesthetic appeal.
A
Norman persona cannot be complete without the characteristic kite-shield.
This was another piece of equipment that proved elusive. Many examples
are of rather shoddy construction, many others feature glaring inaccuracies
such as a metal rim. Fortunately Allan Senefelder of The Mercenarys
Taylor came to the rescue.
Allan was as interested as I was in attempting to recreate the Norman
soldier and he kindly donated a shield to my efforts. The kite-shield,
as supplied by The Mercenarys Taylor, proved to be a solid
piece of work. The poplar wood core is concealed by a front facing
of 5-6 ounce vegetable tanned leather, while the back is completely
covered with felted wool. Rather than a steel rim the shield features
the welcome addition of rawhide edging. The rawhide is fixed in
place with iron nails, with steel clips at the end of each length
of rawhide. Ideally, drilling holes through the shields edge and
sewing the rawhide in place would have probably been a more historically
accurate method of securement.
However, this would have undoubtedly increased the shields cost.
The shields face is finished off with a boss that has been hand
hammered from 16 gauge steel. The hammering of the boss is a welcome
feature that gives the boss a more traditional appearance, when
compared to the machine spun bosses often found on the market.
As with original shields of this type the boss is vestigial and
serves no purpose other than aesthetic detail. The straps used
on the shield are modeled after those found on a surviving 12th
century shield, as such they do not match the strapping arrangements
found on 11th century pictorial sources. Still, the
strapping is solid and provides a secure hold, as well as allowing
for a wide range of adjustment. The strapping in finished off with
an adjustable guige strap. Regardless of any minor issues of historical
accuracy, the kite shield as supplied by The Mercenarys Taylor
is a solid piece of work.
The
spear I have included in the kit has been in my collection for several
years. This piece is manufactured by Arms & Armor of
Minneapolis Minnesota. Arms & Armor calls this piece
their 12th century spear. However, its lugged-socket
design was commonly found throughout the medieval period. The spear
consists of a cast steel head mounted on an ash shaft. The shaft
itself is a bit short for use by a Norman miles but this
is a common issue with nearly all production spears. Issues of
shipping, storage, and transport make a spear of this length far
more practical in the modern world. The shield and spear were painted
in the same color scheme as the helm. This was done as an attempt
to represent an example of early proto-heraldry. Not only did the
painting of armor serve as a means of protection, it also served
as a way to identify the individual on the battlefield. In its
earliest incarnation this proto-heraldry took the form of simple
geometric shapes that could be easily identified from a distance.
I chose to base the shields pattern on a 12th century
Scandinavian painting that depicted a similar design. I felt this
design would compliment the shape of the shield while working well
with the helms paint design. The painting of these items not only
increases the visual appeal of the kit but, in my opinion, it also
enhances the historical value as well.
 |
The
last piece of needed hard kit was, of course, a sword. Surviving
European swords of the 11th century tend to be of the
single-handed variety, with broad blades dedicated to the cut.
The classic medieval longsword had not been developed, nor do variants
such as the falchion or messer seem to have been in use. The sword
I chose for this interpretation is the Reeve, manufactured by Albion
Armorers of New Glarus, Wisconsin.
The Reeve possesses the aforementioned broad cutting blade with
a well defined central fuller. In his typology of the medieval
sword Ewart Oakeshott designated this design as his Type X. The
Type X is a classic blade design that saw widespread use throughout
the Viking age and well into the medieval period. The Reeve also
features the distinctive form of early medieval pommel known to
historians as the Brazil-nut style. The swords guard is a simple
unadorned bar with a slight swelling in its center section. I
have always considered this type of sword to be the archetypal European
design of the 10th and 11th centuries. Swords
of this design saw widespread use throughout Europe and even into
the Middle East during the first crusade. Consequently, a sword
of this type is a natural for use in an 11th century
Norman interpretation.
I chose Albions Reeve, not only for its classic design, but also
because of the swords quality. In terms of overall finish, construction
and handling qualities Albion swords are some of the best in the
production field, as well as being superior to many of the so-called
custom offerings. Since this type of sword is one of my favorite
designs I have owned several throughout the years and this one is
the best by far. The Reeve exhibits the high level of construction
and handling qualities that Albion swords are known for. The sword
handles in a nimble and dynamic fashion that would make it deadly
upon the battlefield. Anyone subscribing to the theory that medieval
swords were heavy and cumbersome bludgeoning instruments should
examine a sword like the Reeve. This one is a quick-handling butcher
knife.
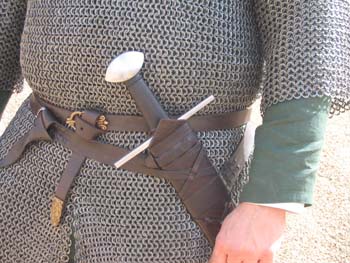 |
Sadly,
one of the items most lacking in todays market is a quality sword
scabbard. Replica arms are of greater quality and variety than
ever before. Unfortunately there are less than a handful of makers
producing historically accurate scabbards of quality. A quality
scabbard is nearly as time consuming to make as the sword it houses
and re-enactors will often be seen carrying good swords in shoddy
scabbards. These kinds of details can ruin an otherwise attractive
kit and I wanted to avoid falling into that trap. Fortunately I
already had an excellent scabbard, made by Swedish smith Peter Johnsson,
in my possession. Peter does not make individual scabbards. However,
this scabbard was made for a sword with the same general blade type
as Albion's Reeve. It is of a pattern quite common from the 11th
to the 14th century and fits the Reeve well.
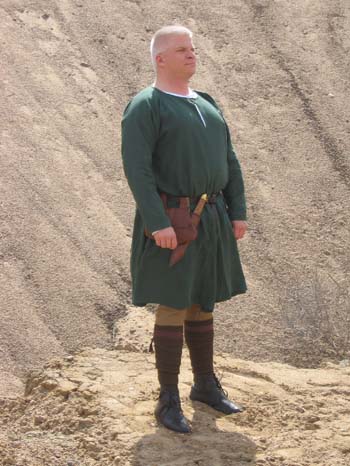 |
It
is very easy to ruin the effect of quality arms and armor by combining
them with low quality, non-period correct, clothing. Fortunately
my wife has many years of experience as a seamstress so this was
not a concern. Other clothing items that my wife could not supply
were purchased from Revival Clothing. The standard materials
used during the middle-ages were linen and wool. Wool was typically
used for outer wear and linen for undergarments. However, my wife
is extremely allergic to wool, so linen was used for both the outer
and under tunics. Norman clothing does not seem to have been overly
elaborate, with status being displayed mostly through color and
material rather than fancy trim and embroidery. For the outer tunic
I chose medium-weight green linen. Once again, the color was chosen
because of its uncomplicated palette, as well as providing a subtle
bit of contrast with the armors color scheme. The under tunic
was made of white linen, to the same basic t-tunic pattern. Both
of these items were machine sewn due to convenience. In the future
I will add embroidery or tablet woven trim to the outer tunic in
order to conceal the machine stitching. When not in armor a simple
pouch, of a design popular from the late 11th to the
15th century, is worn on the waist belt. This pouch
was made by Bohemond Bootmaker. The belt fittings themselves
were purchased from Raymonds Quiet Press. These fittings
are based upon Nordic design, so they cant be considered classically
Norman. These will be replaced as soon as appropriate belt fittings
are acquired.
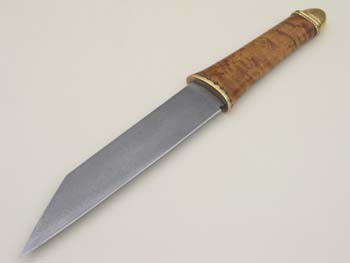 |
Also worn at the belt while in civil dress is a pattern-welded scramaseax
made by Vince Evans. This knife is of Saxon design rather
than Norman. However, the knife might be justified as being an
acquired war trophy, or trade good, in post-Saxon England.
Traditional braies and chausses were purchased from Revival Clothing.
These have proven to be quite comfortable, providing the ties that
secure the chausses to the braies are properly adjusted. Wool winningas,
or leg bindings, are worn on the calves. The exact purpose of this
item is unknown. They may have been used to warm the legs, or to
protect the calves from brush, and seem to have been worn out of
personal choice. I purchased a set of reproduction military puttees
for this purpose. I then dyed them with brown fabric dye in order
to eliminate the 20th century olive-drab military appearance.
The last
piece of soft kit is one of the most important; the shoes. I cannot
express the importance of proper medieval footwear enough. Inaccurate
footwear can ruin the appearance of an otherwise accurate interpretation.
If experimental archeology is the main goal accurate footwear will
aid in the study, whereas modern footwear will prove to be a hindrance.
Accurate shoes will allow the wearer to move as his ancestors did,
whereas modern shoes will provide a completely different impression.
I chose a pair of medieval low boots manufactured by Revival Clothing.
These boots are well constructed and the innocuous design fits in
well with the 11th century kit. I have worn them at several
events and thus far they have proven comfortable and durable.
I have mentioned the factor of expense several times. Here is a
breakdown of the cost thus far.
Helm:
$75.00
Coif: $285.00
Hauberk: $300.00
Spear: $180.00
Sword: $620.00
Scabbard: $600.00
Shield: No Charge
Tunics: $60.00
Chausses & Braies: $80.00
Boots: $75.00
Belt: $45.00
Total: $2,320.00
This
may seem like a significant expense. However, when you compare
this with the cost of a quality plate harness the expense seems
quite affordable. So far I am pleased with the outcome of this
project. Several times since it began I have made the statement,
It's done! I have come to realize this is an on-going project
that will never really be done so I will no longer make that mistake.
I have attempted to list the inaccuracies as I see them and these
details will be remedied and improved upon as time permits. This
project has given me new respect for the men who fought and died
while wearing this equipment, as well as the craftsman who were
responsible for its manufacture.
Conclusion
One
of the unfortunate circumstances of life is that we tend to judge
the actions of the past by our modern standards. When we adopt
this viewpoint we deny ourselves much of what history can teach
us. Our values and morals would have been just as alien to the
medieval mind as their sensibilities would be to us. Its true
the Normans were violent men, but they were men who lived in a violent
age. Ambitions were realized through aggression and justice was
often administered through violent means. While no one would wish
to return to a time as blatantly violent as the middle-ages, at
times it would be nice to see that Norman sense of decisiveness
displayed by our modern leaders. One outlook that has become especially
popular is to glorify the defeated while vilifying the victor.
Because of this many popular historians have chosen to label the
Norman people as brutish conquerors, who subjugated the noble Saxon
and the tolerant Muslim. While it is true that the Normans were
conquerors we must remember, those they conquered were once conquerors
themselves. History has much to teach us but only if we take it
in its totality instead of choosing only the bits that agree with
our modern viewpoints, while ignoring the rest. I have not attempted
to glorify the Normans. Instead I have attempted to portray them
as they really were: a dynamic and aggressive people, who brought
new forms of government and architecture to other lands and in turn
willingly adapted the useful aspects of indigenous cultures to their
own use. By attempting to recreate the kit of an 11th
century Norman soldier I have tried to take my own learning experience
to a new level. I hope the reader may also gain some benefit from
my efforts.
Recommended
Reading
1066
The Hidden History of the Bayeux Tapestry, Andrew Bridgeford, 2005,
Walker Publishing
1066
The Battles of York, Stamford Bridge & Hastings, Peter Marren,
2004, Leo Cooper Pub.
The
Battle of Hastings 1066, M.K. Lawson, 2002, Tempus Pub.
1066
The Year of Conquest, David Howard, 1981, Penguin Books.
Warfare
under the Anglo-Norman Kings 1066-1135, Stephen Morillo, 1994, The
Boydell Press.
The
Normans In Sicily, John Julius Norwich, omnibus edition 1992, Penguin
Press
The
Normans, R. Allen Brown, 1984, St. Martens Press.
Equipment Sources
Albion
Swords
Arms & Armor
Forth Armoury
Get
Dressed For Battle
Historic
Enterprises
The Mercenarys Taylor
Raymonds Quiet Press
Revival Clothing
The
Ring Lord
Vince
Evans
Wholesale
Armor
The
author would like to extend special thanks to Allan Senefelder of
The Mercenarys Taylor and Stephen Brown of Get Dressed For Battle.
Their assistance in acquiring equipment is greatly appreciated.
Thanks also go to Jesse Bailey and Conroi FitzOzbern for allowing
the use of their photographs depicting Norman horse equipment.
The author would like to extend his appreciation to the following
people: to Greg Griggs for braving gale force winds and a mini sandstorm
to man the camera during photography sessions for this article.
Finally to his wife Dorathea, who's invaluable contribution as a
seamstress, as well as a kindred spirit, have been invaluable.
|